CrossOver for Mac is an app that operates as a compatibility layer and helps you play Windows games on your Mac. It works on both Intel and M1/M2 Macs, and supports many Windows games and software. Recently, the possibilities for gaming on Mac have been further expanded thanks to a method that allows gamers to run DirectX 12 games with CrossOver by integrating Apple’s Game Porting Toolkit through a tool called CXPatcher. This guide provides detailed instructions on how to use this new method, as well as some some proven CrossOver fixes for specific game launchers.
CrossOver Mac M1 compatibility
CrossOver is fully compatible for Mac M1, offering a highly effective way to play Windows games on your Apple computer without needing a Windows virtual machine or internet streaming. If you want to play Windows-exclusive games on your Apple Silicon Mac, give this app a try. It also works on Intel Macs, so it’s a good choice for gamers on both platforms. You can test it with a 14-day free trial to see if it suits your needs before making a commitment.
CrossOver Games Library for Mac
The CrossOver games library for Mac is extensive, but until recently, it was not possible to run DirectX 12 titles like Hogwarts Legacy, Elden Ring, and Diablo 4, which was was a major drawback for the app. However, the release of Apple’s Game Porting Toolkit changed the game. This free tool allows DirectX 12 games to run on a Mac. While the toolkit has some issues, such as being tricky for regular users and having bugs, these problems can be easily resolved by integrating it with CrossOver using a free app called CXPatcher. This addition significantly expands the range of popular games available through CrossOver, making it more appealing.
CrossOver and the Game Porting Toolkit
As mentioned above, you can easily combine Apple’s Game Porting Toolkit with CrossOver, and make both programs work much better. The Toolkit is a bit tricky on its own because it involves using complex Terminal commands, which regular users may find challenging. It also has several bugs and issues with various games and game launchers. On the other hand, CrossOver can’t handle DirectX 12 games by itself, but when you integrate the Toolkit, these games become playable, and the performance of most games gets a boost. This magic happens thanks to the free CXPatcher app available on GitHub, which is open-source software primarily supported by donations. In our guide, we’ll start by explaining how to install CrossOver. Then, we’ll walk you through the steps to make DirectX 12 games work with it by integrating the Game Porting Toolkit.
CrossOver Steam compatibility
CrossOver works seamlessly with Steam, allowing the Windows version of the Steam client to run smoothly on your Mac. This means you can easily install and play a wide range of Steam games on your Mac, including DirectX 12 titles if you’ve integrated the Game Porting Toolkit. Similarly, you can also run games from other stores like Epic or GOG, but it may require a couple of extra steps. To play your Epic Games Store and GOG games, you’ll need to use the Heroic Games Launcher. For games from Battle.net and EA, you’ll need to apply some simple workarounds, which we’ll explain below.
How to use CrossOver
To play games with CrossOver on your Mac, follow these simple steps:
- Install CrossOver on your Mac.
- Create a new “bottle” (a container for your game).
- Install the game launcher you want to use (Steam, Epic, GOG, etc.).
While Steam works smoothly, accessing Epic, GOG, Battle.net, or EA libraries involves additional steps, which we’ve explained separately in our guide.
Once everything is set up, using CrossOver is a breeze. Open the app, select the bottle where you’ve installed your game, and double-click the game or game launcher to start playing.
NOTE: To run DirectX 12 games in CrossOver by integrating the Game Porting Toolkit, make sure your Mac has macOS Sonoma installed.
Install macOS Sonoma
Apple’s latest major macOS release is macOS Sonoma, and this OS version is a requirement for using the Game Porting Toolkit. You can get the beta version of macOS Sonoma from Apple’s website right now by following these steps:
- Make sure your Mac is running macOS Ventura 13.4 or a later version. You can check this by going to System Settings > General > Software Update and update your system to macOS Ventura 13.4 if needed.
- Visit developer.apple.com and click on the ‘Account’ tab at the top of the page.
- Sign in with your Apple ID and complete two-factor authentication if prompted.
- Agree to the terms of the Apple Developer Agreement, check the provided box, and click ‘Submit’.
- Restart your Mac to ensure optimal performance, especially if you’ve recently set up a developer account or updated your operating system.
- After restarting, go back to System Settings and select General > Software Update.
- Look for an ‘info’ icon next to Beta updates and click on it.
- In the Beta Updates window, switch from ‘Off’ to ‘macOS Sonoma Developer Beta’ and click ‘Done’. This step prepares your system for a Sonoma upgrade and the Game Porting Toolkit.
- When macOS 14 Beta appears in the Software Update panel, click on ‘Upgrade Now’.
- Follow the on-screen instructions to complete the upgrade, making your system ready for the Game Porting Toolkit installation.
Step 1:
Download CrossOver on your Mac by clicking on the button below.
Step 2:
Open the downloaded DMG file, then drag the CrossOver icon to the Applications folder to install the app and open CrossOver.
When you first open the app, you’ll have two options. If you’ve already purchased CrossOver, click “Unlock with Purchase info” and enter your details. If you want to try it for free, just click “Try Now,” and the app will open.
To play DirectX 12 games in CrossOver and improve the performance of DirectX 11 games, add the Game Porting Toolkit. Click the button below to find out how.
Game Porting Toolkit Integration steps
- Visit this Apple page and sign up with your Apple ID (you don’t need a developer’s account).
- Search for the Game Porting Toolkit, click “View Details,” and download the Game Porting Toolkit DMG file (it’s still in beta, so get the beta version).
- Once the Game Porting Toolkit DMG file is downloaded, double-click to open it and minimize the folder that appears.
- Now, go here and download the latest release of CXPatcher by clicking the ZIP file in the “Assets” section.
- Double-click the downloaded ZIP file to extract its contents, and then move the CXPatcher app to your Applications folder.
- Open your Applications folder and double-click the CXPatcher app. If it doesn’t open, go to the Utilities folder, start the Terminal, and copy-paste this command: “xattr -cr “. Return to the Applications folder, drag the CXPatcher icon into the Terminal, and execute the command once the patcher’s path appears. You should now be able to open CXPatcher.
- In CXPatcher, click “Agree and Proceed,” and enable both “Enable External Resources” and “Allow repatch / upgrade.”
- Click “Locate External Resources,” search for the Game Porting Toolkit under the “Locations” section in the left panel, select it, and click “Open.” If this doesn’t work, try selecting the “Lib” folder in the Game Porting Toolkit folder to specify it as an external resource.
- Return to your Applications folder and drag the CrossOver app into the patcher window. If you see the message “CrossOver.app has been successfully patched,” it means the Game Porting Toolkit is now integrated with the app, and you can proceed to download and play your favorite DirectX 12 games.
Step 3:
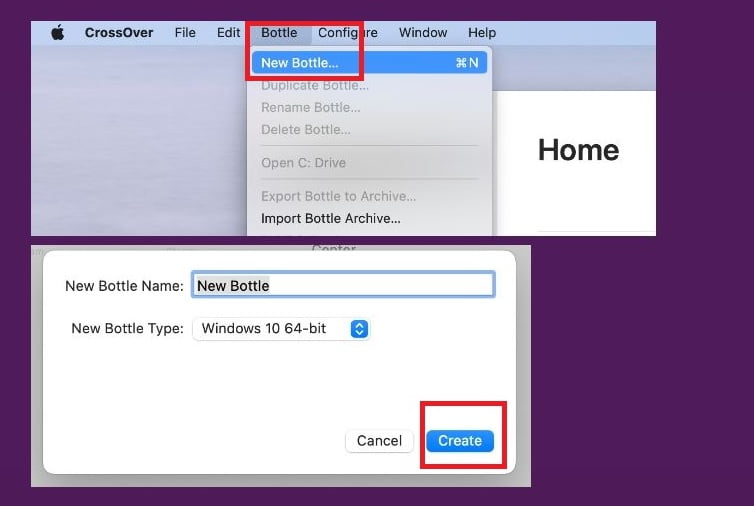
In CrossOver, go to the menu bar, click on “Bottle,” then select “New Bottle”. Enter a name for your bottle, choose “Windows 10 64-bit” as the type, and click “Create”.
Step 4:
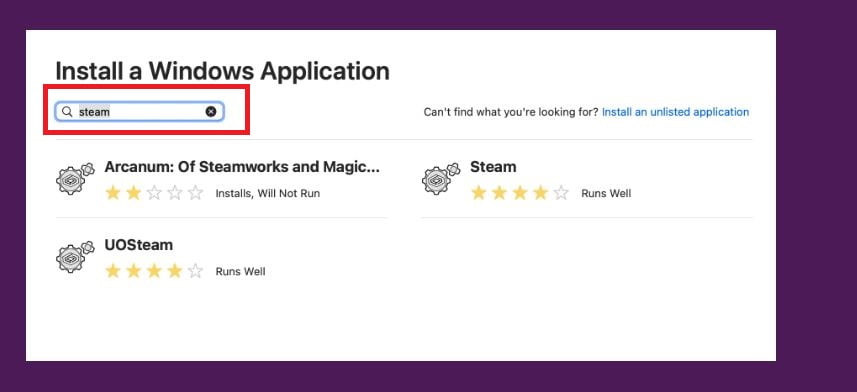
Choose the new bottle on the left side, then click the “Install” button at the bottom-left. In the search bar, type “Steam,” and click on the Steam app when it appears.
Step 5:
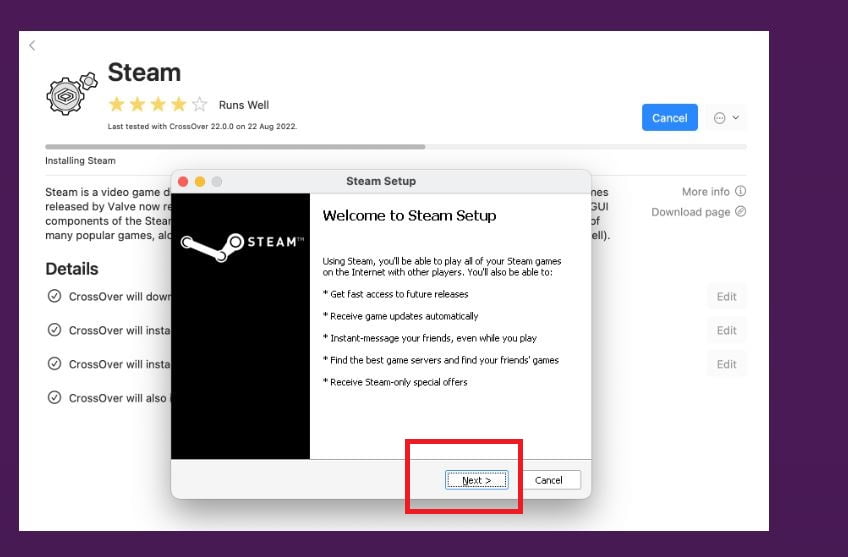
Click “Install” and follow the instructions to install the app. While Steam is installing, keep an eye on your Dock because there might be installation wizards opening in the background. They might need your permission to complete their installations.
Step 6:
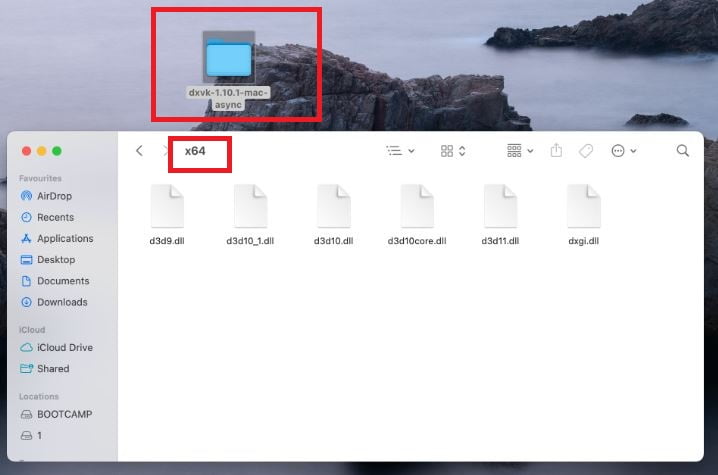
After that, visit this page and download the most recent DXVK version. Click on the first .zip file listed in the “Assets” section. When the download is complete, open the ZIP file, and access the x64 folder inside it.
Step 7:
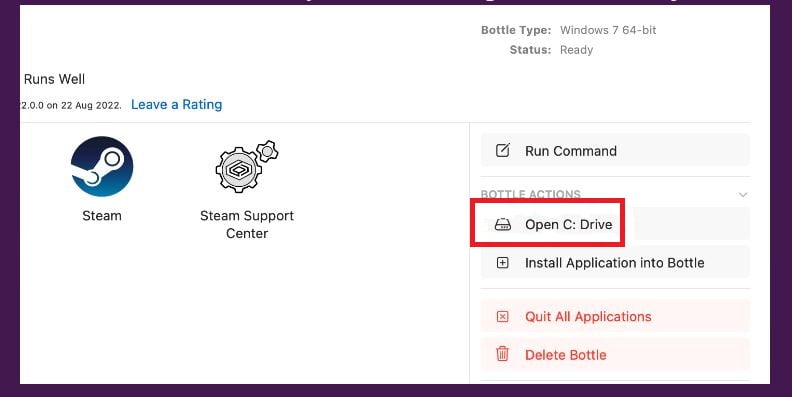
Then in Crossover, click on Open C: Drive, and go to windows > system32.
Step 8:
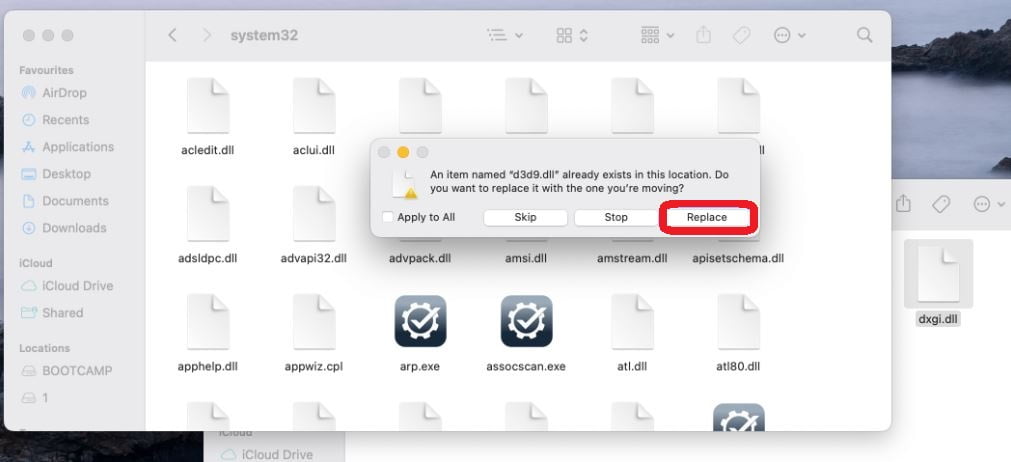
Now, return to the x64 folder inside the downloaded DXVK ZIP file. Copy all its contents and paste them into the system32 folder. When asked if you want to replace files with the same names, choose “Replace” for everything.
Depending on the game you want to play, you’ll need to either enable or disable the DXVK option in the CrossOver settings before launching Steam. For DirectX 11 and DirectX 12 games, turn it off. For games that use a different API, keep the DXVK feature enabled.
Step 9:
Now you’re all set to play your game. Locate it in your Steam library, click “Install,” and then hit “Next” to start the installation. Once it’s ready, click “Play” in the Steam client, and the game will launch through CrossOver.
CrossOver fixes for specific game launchers
In this section, we’ll provide crucial fixes for CrossOver, especially for starting specific game launchers like Epic, GOG, Battle.net, and EA’s app (replaced with Origin here). These fixes will help you get these game launchers up and running.
Install Battle.net in CrossOver
To play Blizzard games like Diablo 4 or Overwatch 2 on your Mac using CrossOver, you’ll need to install the Battle.net launcher with a few extra steps to make sure everything works correctly:
- Create a dedicated CrossOver bottle for Battle.net. This bottle isolates the software to prevent conflicts.
- Look for Battle.net within CrossOver and install the regular version of the app. Be mindful of any additional apps that may pop up in the Dock during installation; you might need to grant them permission.
- After installing Battle.net, log in to your account, and then close the launcher by clicking the X and selecting “Exit Application.”
- Next, click the “Run Command” button on the right side of the CrossOver panel. Choose the Battle.net bottle, type “regedit” in the “Running” field, and click “Run.”
- In the Registry Editor window, navigate to HKEY_LOCAL_MACHINE\Software\Microsoft\Windows NT\CurrentVersion. Double-click the “CurrentBuild” item and set its value data to 19042. Also, do the same for the “CurrentBuildNumber” item.
- Now, restart the Battle.net launcher within CrossOver, and you’ll be ready to play games like Diablo 4 and others that you own.
Play Overwatch 2 with CrossOver
To play Overwatch through CrossOver, follow these additional steps:
- First, create a copy of CrossOver in your Applications folder, and use this copy for the following instructions.
- Right-click the CrossOver copy, select “Show Package Contents,” and navigate to Contents > Shared Support > CrossOver > lib > wine > x86_64-windows.
- In this folder, you’ll find two files: dxgi.dll and dxgi.dll_orig. Rename the dxgi.dll file to dxgi.dll.gptk, and rename the dxgi.dll_orig file to dxgi.dll.
- Now, enable the DXVK feature in CrossOver and launch the Battle.net launcher.
- With these modifications, you can download and install Overwatch 2 in this specially adjusted CrossOver copy, and the game will run smoothly without any issues.
Play EA games with CrossOver
To play EA games in CrossOver, you’ll need to use the discontinued Windows version of EA Origin, as the current EA App doesn’t work with CrossOver. However, when you install Origin and log in, you’ll face a prompt to upgrade to the EA App, which prevents you from using Origin. We’ve discovered a workaround to solve this issue and enable you to run EA games through Origin in CrossOver.
This fix not only allows you to use Origin but also ensures that EA games you own on Steam launch through Origin, making it possible to play them in CrossOver. Keep in mind that while this method lets you play EA games in CrossOver, it may not address specific game-related issues that could prevent certain games from running correctly through the compatibility layer.
- Create a new CrossOver bottle with Windows 10 (64-bit).
- Right-click the bottle, choose “Install Software into <Bottle name>,” and search for “Origin.”

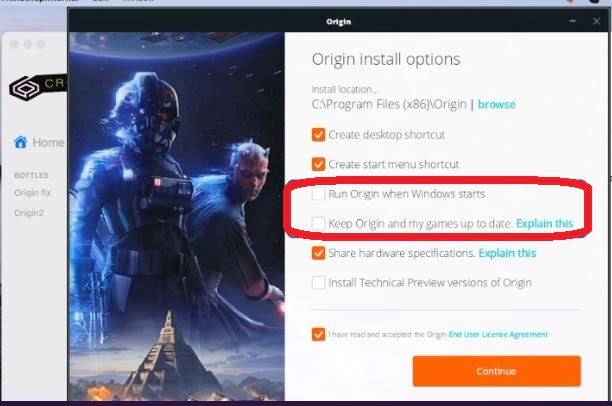
- Click on the Origin icon, then click “Install,” and proceed with the installation process. When you reach the pre-installation settings, make sure to disable the “Keep Origin and my games up to date” option to prevent automatic updates. We also recommend disabling the “Run Origin when Windows starts” option.

- After Origin is installed and you reach the login screen, do not log in. Simply close the login window and move to the next step.
- Download a patcher from this link and save it to your Desktop.
- In CrossOver, open the bottle where you installed Origin, and click “Open C: Drive” in the right panel.
- Drag-and-drop the patcher you downloaded into the bottle’s drive, and then double-click it.
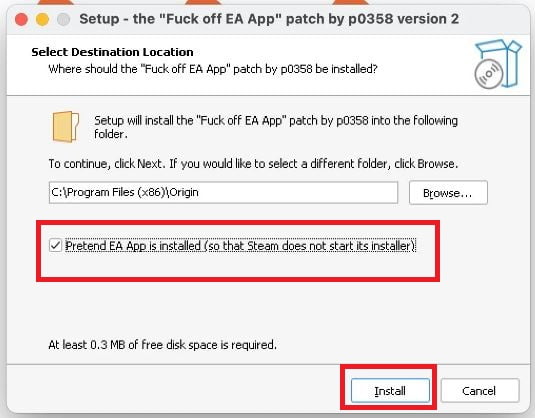
- Once the patch installer opens, check the “Pretend EA App is installed” option, and click “Install.”

- Next, select the “Wine Configuration” option in the lower-right corner. Go to “Libraries,” and click the downwards arrow in the “New override for library” text field. Search for an entry labeled “Version,” select it, and click “Add.”
- Find the “Version” entry in the “Existing overrides” list, and ensure that what’s written in the brackets after it is “native, builtin.” If it shows something else, select the “Version” entry, click “Edit,” and change its “Load order” to “Native then Builtin.”
- Click “Apply” and then “Ok” to close the Wine Configuration window. Finally, double-click the Origin app to launch it.
- Log in with your EA account, and you should now be able to use Origin without receiving the prompt to upgrade to the EA App. From this point, you can access your library, download the games you want, and launch them through Origin.

Playing Epic and GOG games in CrossOver (through the Heroic Games Launcher)
To play games from Epic Games and GOG using CrossOver, you’ll need the Heroic Games Launcher, an open-source alternative. Here’s how to set it up and use it:
- In CrossOver, create a new bottle labeled “Heroic,” and choose either Windows 7 (64-bit) or Windows 10 (64-bit) as the bottle type.
- Visit this website and download the Mac version of the Heroic Games Launcher compatible with your Mac’s chip (Intel or M1/M2).
- Open the downloaded Heroic DMG file, and drag the launcher’s icon into your Applications folder.
- Go to the Applications folder, and double-click the Heroic Games Launcher. If you encounter issues opening the app, right-click it, select “Open,” and then click “Open” again to launch the launcher.
- Once Heroic is open, click on the Epic or GOG login icon, and log in to the respective store. Your gaming library from that store will be automatically imported into the Heroic launcher.
- Next, click on “Library” in the top-left, search for the game you want to play, click on it, and then hit “Install.” Install the game without altering its installation path.
- After that, go to “Settings” in the left panel, select “CrossOver,” and ensure that the name in the “CrossOver Bottle” section is set to “Heroic” (or whatever name you gave your CrossOver bottle).
- Open CrossOver, go to your Heroic bottle, choose whether to use the DXVK setting, and double-click the game to start playing.
Ubisoft Game Launcher in CrossOver
Unfortunately, we haven’t discovered a reliable method to play games through the Ubisoft Game Launcher in CrossOver. While some users claim they’ve successfully installed and used the launcher, we haven’t yet identified a consistent way to do so. You can attempt to install the Ubisoft launcher in a new bottle to see if it works for you, but currently, we don’t have a verified solution. We’ll continue our search for a way to play Ubisoft games in CrossOver, and if we find one, we’ll include it in this article.
Leave a Reply